Category Archives: Guides

Any guides that GEEK! create will slot into this category.

Removing visualizations in Windows Media Player 11

Ok, so I was bored with the visualizations in Windows Media Player 11 and I decided to get some new ones from Microsoft. However, now I’m bored of those and don’t want them anymore, I went ahead into the Windows Media Player settings, into the Plugins tab, and what? The remove button on the Visulizations tab is greyed out. Why?

Anyhow, we all know that you can always get something done in Windows with a bit of determination, so I did a quick Google search, and found someone with exactly the same problem. After a short period of searching around on the internet, I have a solution.

So, the first thing you need to do is determine the location of the visualizations. This should be at:

C:/Program Files/Windows Media Player/Visualizations/ (replacing C with your hard drive letter)

However, in some cases they can be found at:

C:/Program Files/Windows Media Player/Visualisations/ (replacing C with your hard drive letter)

Once you’ve found them, you need to use regsvr in Command Prompt to remove any registry keys associated with the visualization. You may need to run Command Prompt as an administrator (right click Command Prompt in start menu > accessories, and click Run as Adminstrator). Before doing this, make sure Windows Media Player is closed and that the wmplayer.exe program is not running in Task Manager.

Once it’s closed, you need to open Command Prompt (run “cmd” without quotes) and type the following. 

CD C:/Program Files/Windows Media Player/Visualizations/

Again replacing the C with your drive letter. If that doesn’t work (a directory is not found) try:

CD C:/Program Files/Windows Media Player/Visualisations/

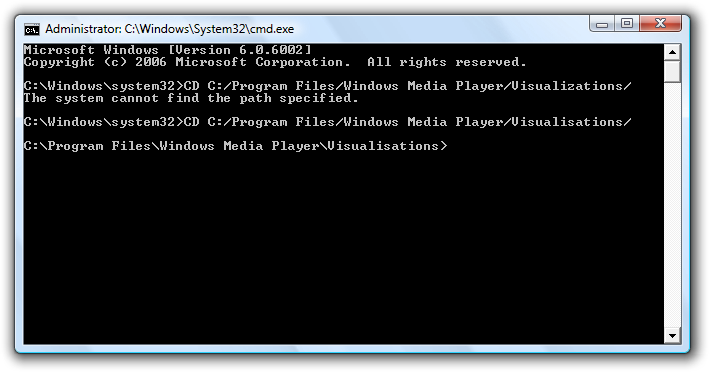
Here is a screenshot of what you should have in command prompt so far:

administrator__c__windows_system32_cmdexe_1be953d0d5304a31b8da15e8ef10fa4e

Once you are in the correct directory, type “DIR” without quotes to get a directory listing.
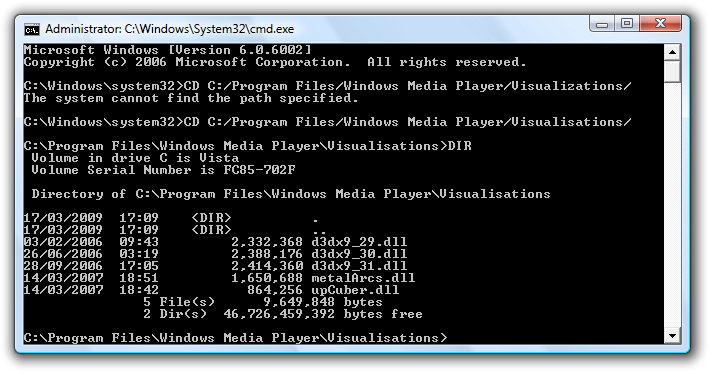
administrator__c__windows_system32_cmdexe_2dbb0c29047547fca44c7657b71ea177Now, knowing which visualization dll you want to remove you need to unregister it. For the purposes of this demo, I’m going to call the visualization I want to remove “visualization.dll” but you’ll need to use the .dll you want to remove. 

So, type into the Command Prompt you have open:

regsvr32 -u “C:/Program Files/Windows Media Player/Visualizations/visualization.dll

or if that doesn’t work

regsvr32 -u “C:/Program Files/Windows Media Player/Visualisations/visualization.dll

replacing the visualization.dll with the .dll of the file you want to remove.

You’re probably thinking wow this ain’t half complicated. Well it seems like that at first, but after a while you get the hang of it.

Anyway, moving on. Once the .dll is unregistered, you just need to open the location of the .dll in Windows Explorer, and then delete the .dll. Once that is done, that should be it. 

Open up Windows Media Player, and check in the Visualizations list to see whether the visualization has gone. It shouldn’t be on the list.

You’ll need to do this for every visualization you want to remove. At first it may seem like this may take forever, but seriously, once you’ve done one it’ll become very easy and quick.
EI System 1201 with 2GB RAM – Tested and confirmed

Well after my post I did a little while back, I decided I would pluck up the courage and actually go and buy a 2GB RAM chip for my laptop.  It arrived today (special delivery from Crucial) and I just got it fitted. Guess what? Works an absolute dream! Vista is so much faster and usable!! Absolutely love it. Would recommend any day!

So for those who are interested, this is what I bought: 2GB PC-5300 DDR2 200pin SODIMM. Make sure you get the 2GB chip and not the 2x1GB kit as the laptop does only have one slot.

Once its fitted, fire up the laptop and see how quickly it boots. It doesn’t boot quickly first time as it works out it’s had a hardware boost, but once you’ve booted it for the first time shut it down and boot it again. With any hope, it will be much quicker.

So, there you go, for the people who were wondering, you can run an EI System 1201 with 2GB RAM. Sorted.

Should you defragment your RAM? (How to guide)

Well, everybody knows that Vista can’t really be ran on 1GB RAM – especially if you use a lot of system programs. I personally know differently, because I’ve found out that if you can “defragment” your systems RAM once the amount of available RAM falls below a certain point, you can clear up some used RAM (often quite a lot) and make your computer much more usable.

Trouble is, there isn’t much free software you can find that does the thing I want it to do. I have found one program, though, and despite the fact it doesn’t claim it will run on Windows Vista (the program was created in 2003), it will run fine without any issues.

You can grab the program here, and it is completely free (unlike most of the shareware I found on the internet). Just download the ZIP file, run the included EXE file, and when it is installed and it runs for the first time say Yes when it asks if you want to configure it.

Make sure your configuration options match mine:

ram

When that’s done, you should see it defragment in a dialog box. When it’s done, just click Send to Tray. You’ll see in the notification tray area a black box with a number in it. That is the amount of RAM available.

The system will automatically defragment the RAM when less than 1/3 of it is available. But, if you want to manually defrag it, just double click the icon.

Simple as that. You’ll get better performance and also be able to run more programs at the same time. The program will automatically load up on boot, so you won’t have to constantly reload it.

Also, the program will work on all computers from Windows 95 upwards so you can basically use it on any PC.

Enjoy, and post a comment if you have any problems.

Vista and stupid notification bar not showing common items!

I have recently been having a problem in Vista, where the three common notification items (battery, network, and volume) don’t show on the notification bar. It’s a pain, and if you try and fix it by right-clicking on the Start bar and clicking Properties, and then clicking the Notification Area tab you just get all of the items greyed out. It’s ridiculous and it never used to happen – it just started happening a couple of weeks ago.

So, when it frustrated me enough to persuade me to Google the issue, I found I’m not the only one with a problem. Apparenly, it’s an issue with the Local Group Policy Editor, and can be fixed either with the Local Group Policy Editor (if you have it enabled) or via the Registry Editor.

If you go to this site, you’ll find some guides that can fix the problem via the Local Group Policy Editor or via the Registry Editor.

However, I still can’t seem to get it working properly. Some of the icons show but I’m usually missing one or two.

Update 24.9.09: I thought rather than linking to another site, I could write a guide on how to fix it myself :P. So, if you’re having the problem, follow these steps to solve it:

1. First, click Start and type in the search box regedit, then press enter.

2. The Registry Editor will open. You now need to use the plus signs next to each category to reach the key below.

Navigate through the following threads:

HKEY_CURRENT_USER, Software, Classes, Local Settings, Software, Microsoft, Windows, CurrentVersion, TrayNotify

3. Delete the following keys by highlighting them and pressing the delete key, confirming by clicking Yes:

IconsStream

PastIconsStream

Now simply log off and log back on and your problem should be solved, or restart the explorer.exe process if you don’t want to log off.

Hopefully, if all that goes smoothly, you should have the icons back (thank god!)

Tiscali Router (Siemens SE587) and confusing port forwarding…

I use Tiscali Broadband very regularly, and generally the service they provide is fantastic. The broadband is very cheap for what you get, and most of the time I have no problems. Except…

The Tiscali router firmware is quite strange. Especially in the port forwarding settings. In my scenario, I need to be able to port forward my Network Drive up to the internet so I can access it when I’m not at home (or so that downloads on http://download02.geekonthepc.com work). Ok, that’s fine, I just put the port forwarding info into the config settings…


Router Config

Look OK to you (you might want to see a full size image but clicking on the image)? Looks OK to me.

So I go to test it – open up Filezilla, and go to my IP, and wait a sec – connection rejected by server? What?

So I go back and check the settings again. No, they are fine. What’s going on?

Well, after several hours of endless confusion, I’ve finally worked out how (oddly) it works.

It does actually port forward, however if you try and access it on the same Tiscali router you are trying to port forward from, for some reason the connection is rejected. But if you go to another wi-fi connection, it will allow it and you’ll get in.

It’s very odd, but at least it’s working. You can be sure that its working if you go to http://status.geekonthepc.com/networkdrive and it’ll ping it from the Tiscali router (update: the server has since been taken off the internet).

So there you go, Tiscali port forwarding does work – it’s just a firmware bug that Tiscali/Siemens should just sort out.