Category Archives: Quick fixes and tips

Any quick fixes and tips that GEEK! write about will be placed in this category.

Guide: A simple way to make a WEP key

There are too many people around who have their wifi routers unsecured. Why? Well there are horrible people out there who think it’s right to connect to your wifi. Believe it or not, it’s stealing and if you are caught you will get in trouble.

It’s a really good idea to set up a security key for your wifi. It is simple to do and will save you a lot of hassle. OK, if you live in the middle of a field in a rural area, chances are that there won’t be any wifi-jackers (that’s what I call them) anywhere near you, but you never know.

I get questions from quite a few people about making a good, secure wifi key that’ll keep those unwanted wifi-jackers away. Most routers automatically set up a WEP key when you set them up, but they can be hard to remember and annoying when you need them regularly.

I say the same thing to everyone – there is an easy way to create a simple easy to set a key to remember. An important date you you (such as a birthday) and and another important 2 digit number (such as your house number). I suggest you have it like this:

DDMMYYYYHH

KEY: D – Day, M – Month, Y – Year, H – House number.

So, if my birthday was on the 12th of June 1978 (it isn’t, seriously!) and my house number was 9, I’d set it like this: 1206197809.

You won’t forget it, I promise. As long as you remember the structure you’ll be fine. I find it a really simple way to make a good, secure WEP key. As long as you don’t tell anyone else that it’s the structure of your security key, you won’t get any unwanted intruders chewing up all your bandwidth and getting you into trouble with the law.
Freecom Network Drive and 4GB file size limit – a little discovery

I’ve discovered something very pleasing about the Freecom Network Drive today.

I was copying a bunch of files to my Network Drive today, not noticing that in the bunch there was a 6GB file, which in theory should not copy because there is theoretically a 4GB file size limit on the Freecom Network Drive since it is formatted in FAT32.

However, after leaving the computer to copy the files, I came back to check it later that afternoon, and to my amazement the file had copied with no issues. I opened the file from the Network Drive and it worked perfectly.

I was astonished, so I decided to connect the Network Drive up to my computer over USB to see if their had been any disguised file splitting or anything like that. And yes, there was. The file had split into one 4GB file and another 2GB file.

I connected the drive back up over LAN and the file was one 6GB file again.

I am very pleased with this, as it means that the 4GB file size limit is not necessarily true. Freecom doesn’t advertise the fact that the Freecom Network Drive can split files and therefore store files bigger than 4GB, so you might want to bare that in mind if you are considering getting a network drive in the near future.

Poor wifi signals? Is it interference? (Quick fix)

I was recently very bewildered since the wifi singal range on my router was still very poor even after adding a huge 9DBi antenna to it. I couldn’t understand why, but then I did some research and found some rather interesting information.

It would appear that if you use a cordless phone, you may be aware that most common cordless phones run at a frequency band of about 2.4GHz. Sound familiar?

Well, you may also be aware that both 802.11b and 802.11g wifi signals (as well as some 802.11n) both run 2.4GHz.

What a coincidence. Anyway, what that means is that if your router and cordless phone base are close together (ie less than 50cm apart), they can interfere with each other and therefore reduce signal range quite dramatically.

This was the problem I seemed to be having. So I move my router so it was about 100cm (the further the better, ideally) from the phone base, and the signal range increased hugely. It also put an end to the regular connection drops I got while using wifi.

So, a simple thought, but it really does make a difference. It’s not just cordless phones, but anything near a router that runs at a frequency of 2.4GHz or 5GHz. Bare it in mind.

Together with my 9DBi antenna, I now get fantasic wifi signal that I’m really pleased with. It made a huge difference, so definitely consider it before blaming a router or router antenna.

Guide: Convert your MP3 audiobooks into formats that iTunes will recognise as an audiobook!

Wow, long title! Anyhow, this is the first guide I am making that will be posted on the general blog. And today I’m going to be explaining how to covert your MP3 audiobooks into the format that iTunes will recognise as an Audiobook, and will place in the Audiobooks section on your iPod.

Continue reading

Removing visualizations in Windows Media Player 11

Ok, so I was bored with the visualizations in Windows Media Player 11 and I decided to get some new ones from Microsoft. However, now I’m bored of those and don’t want them anymore, I went ahead into the Windows Media Player settings, into the Plugins tab, and what? The remove button on the Visulizations tab is greyed out. Why?

Anyhow, we all know that you can always get something done in Windows with a bit of determination, so I did a quick Google search, and found someone with exactly the same problem. After a short period of searching around on the internet, I have a solution.

So, the first thing you need to do is determine the location of the visualizations. This should be at:

C:/Program Files/Windows Media Player/Visualizations/ (replacing C with your hard drive letter)

However, in some cases they can be found at:

C:/Program Files/Windows Media Player/Visualisations/ (replacing C with your hard drive letter)

Once you’ve found them, you need to use regsvr in Command Prompt to remove any registry keys associated with the visualization. You may need to run Command Prompt as an administrator (right click Command Prompt in start menu > accessories, and click Run as Adminstrator). Before doing this, make sure Windows Media Player is closed and that the wmplayer.exe program is not running in Task Manager.

Once it’s closed, you need to open Command Prompt (run “cmd” without quotes) and type the following. 

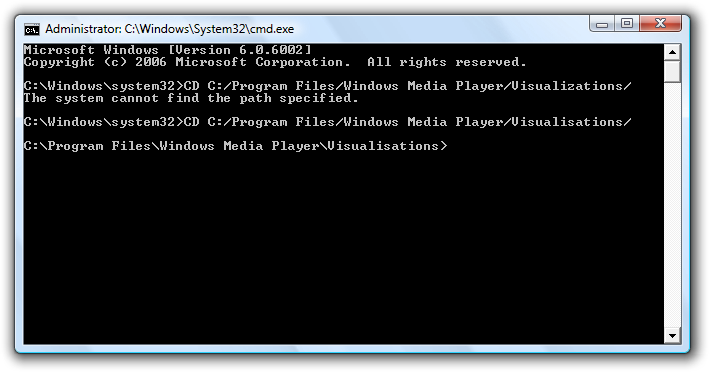
CD C:/Program Files/Windows Media Player/Visualizations/

Again replacing the C with your drive letter. If that doesn’t work (a directory is not found) try:

CD C:/Program Files/Windows Media Player/Visualisations/

Here is a screenshot of what you should have in command prompt so far:

administrator__c__windows_system32_cmdexe_1be953d0d5304a31b8da15e8ef10fa4e

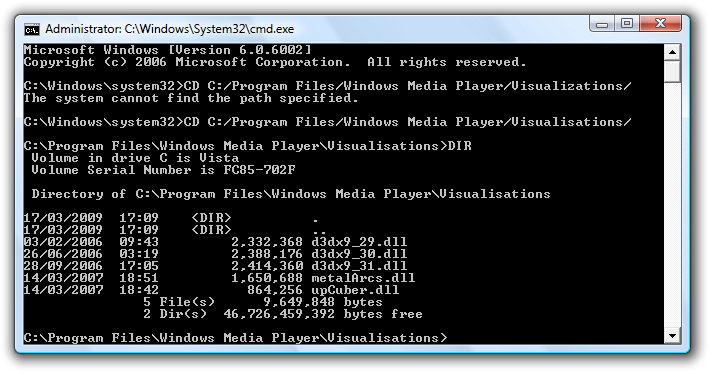
Once you are in the correct directory, type “DIR” without quotes to get a directory listing.

administrator__c__windows_system32_cmdexe_2dbb0c29047547fca44c7657b71ea177Now, knowing which visualization dll you want to remove you need to unregister it. For the purposes of this demo, I’m going to call the visualization I want to remove “visualization.dll” but you’ll need to use the .dll you want to remove. 

So, type into the Command Prompt you have open:

regsvr32 -u “C:/Program Files/Windows Media Player/Visualizations/visualization.dll

or if that doesn’t work

regsvr32 -u “C:/Program Files/Windows Media Player/Visualisations/visualization.dll

replacing the visualization.dll with the .dll of the file you want to remove.

You’re probably thinking wow this ain’t half complicated. Well it seems like that at first, but after a while you get the hang of it.

Anyway, moving on. Once the .dll is unregistered, you just need to open the location of the .dll in Windows Explorer, and then delete the .dll. Once that is done, that should be it. 

Open up Windows Media Player, and check in the Visualizations list to see whether the visualization has gone. It shouldn’t be on the list.

You’ll need to do this for every visualization you want to remove. At first it may seem like this may take forever, but seriously, once you’ve done one it’ll become very easy and quick.